Tuesday, June 6, 2017

How to use the Navigation App on Android

Smartphones really do seem to have a never ending list of uses and whether youve got a band new Samsung Galaxy S2 or a or a really old HTC Wildfire youll be able to use it to navigate your way around a town, cit y or even the country thanks to the Navigate app. Firstly you will need to find the app which resembles a blue triangle (see the screen shot to the right for an example of how it may look in an app draw).
After opening the app you will be asked to allow the use of GPS. The GPS will need to be turned on for the navigational purposes so turn it on when prompted.

After turning on GPS you will see a screen like the one to the left. What you need to do is click on either "Speak destination" or, as Ive done in the screen shot "Type destination". Once youve got your destination in the search bar press on the magnifying glass and your phone will figure out (via GPS) the best route for you to get from where you are to the destination)

When your phone has worked out your route you will be be shown a map like the one to the right for you to follow and thanks to the GPS being enabled you can actually track your progress (with you being the blue "dot" and the checkered flag being the destination). If you wish to zoom in for a better accuracy you can use the magnifying the magnifying glass in the bottom corner to zoom in however a more useful function is the directions screen. To access the directions screen you need to click on the little "list" icon.

The directions screen is wonderfully simple telling you the road you need to go on, the direction and the distance. Though this isnt the end of the wonders of the Navigation app. If you click on one of the directions
youll get a screen like the one on the right which shows your actual progress through that stage in a sort of "birds eye".

From the screen to the right you have 3 options. You can go back to the directions screen (press on the list icon), you can go to the next stage (press the arrow along the top) or you can go to street view (press the man at the right hand side).

 Street view gives you the most detailed image of where you are looking at and is a great way to check that youre in the right place, going in the right direction. From the Street View you can again scroll through the stages of your route by pressing the arrows along the top of the screen.

Although the app m ay be trying to help drivers (and it does with a number of its more advanced functions) it can also help those lost in a new city who are looking for something like a landmark or a hotel (and using street view really makes that simple).

It needs to be noted that using navigation will use up data (whether its mobile data or Wi-Fi you will need to be connected to one or the other) and as its running GPS you may find that your battery will run down quicker than usual so dont use it for prolonged durations with out the ability to change the handset. Whilst you should be able to get a few hours out of a full charge, a car charger will be needed if you are trying to cover the country whilst using the app.

Monday, June 5, 2017

How to blacklist numbers on Android 2 3 5

 Way back when the Samsung Galaxy S2 was released I did a guide on stopping number from calling your phone. Back then I was using an early release of Ginger (most probably 2.3.3 or even 2.3.2) and since then things have changed quite a lot with most people running 2.3.5 or 2.3.6 (if theyve not already gone to Ice Cream Sandwich). This has meant the original guide (which can be read here) is now quite dated and lacks a specific step that we will cover in this guide.

Instead of changing the original article, which does still help people running early versions of Gingerbread I thought it was worth starting from scratching and making this a cover all for every phone running Android 2.3.5 (and likely 2.3.6). The
actual method isnt much different to the original guide but their are some noticeable differences so lets start with setting screen (in the top left of this guide). From the settings menu you need to select "Call" and then "Call rejection" which is a screen like the screen shot on the left of this paragraph.

From the "Call rejection" screen you need to select "Auto reject mode" this will open

up a menu with 3 options: "Off", "All numbers" and "Only black list". From here you need to select "Only black list". After this the numbers on your black list wont be able to call your phone. What is actually quite annoying is that this step wasnt there in the original version of the software so you didnt need to do that and now you do.

After you select a choice from the "Auto reject mode" menu you will go back to the previous screen with the "Black list" option. Now you can either click on "Black list" and then click "Add" then add the number you wish to blacklist. Though it can be difficult to remember a whole mobile number so what I would advise is following the original black list guide (click here) and adding the numbers to the black list via your contacts screen.


Note-When you set an "Auto reject" mode you wil l see a new symbol along the notification bar of a red phone, an "A" and a "No" symbol, this is to say "Calls automatically rejected". The symbol can be clearly seen on the large screen shot alongside this paragraph with a white arrow pointing towards it.

This guide should work on any phone running Android version 2.3.5 and this includes the likes of a Samsung Galaxy S2, HTC Sensation XE and many many other.

Sunday, June 4, 2017

Quick fixes and answers to Samsung Galaxy S6 texting issues other messaging problems

Texting problems are among the most common issues we received from Samsung Galaxy S6 (#Samsung #GalaxyS6) owners. So, this post is intended to answer some of the questions and solve some of the problems we received.
Galaxy-S6-text-message-attach-picture
Read on to learn how to address the problems I cited in this article. There’s a chance you may encounter one of them. Just click on the link to jump on a specific problem…
  • Can’t attach pictures to text message and vice versa
  • Group conversation option disappeared on T-Mobile Galaxy S6
  • Some group messages come in as empty bubbles
  • Having difficulties receiving text messages from HTC One
  • Can’t send a video through text message
  • Can’t send text message to multiple recipients
  • Send / Receive multimedia message through Wi-Fi
  • Can’t receive group text from a certain number
  • Verizon Galaxy S6 on MetroPCS Can’t download MMS
  • Assign names to group messages on Galaxy S6
  • Can’t attach pictures to text message and vice versa 
    Problem: When texting, I can’t combine both text and an attachment (usually a photo) in the same message.  When I first got my phone I could do this, but no longer. Now I only get the option to attach and send, so I’m forced to send two separate messages.
    1. Also, most of the time when sending a photo when texting, the message does not send immediately, I get a long download time with a “Cancel” button at the bottom of the text. Sometimes these messages fail to get delivered, or are not deliv ered until hours later. This problem started at the same time as the above problem.
      Solution: It has something to do with VoLTE; disable it and you should be able to send MMS or picture messages like you did before. Just open the Phone app > tap on More > choose Settings > under Call settings section tap Voice over LTE > choose Do not use VoLTE.
      Group conversation option disappeared on T-Mobile Galaxy S6
      Problem: Hi, so I and my roommates both have the Galaxy S6. I am on T-Mobile and he is on Verizon. When I got my phone back in the summer I really enjoyed the feature on the messaging app that let’s you quickly switch between group messaging or sending a single message to many people individually, I used it quite often. About a month ago my option for that disappeared, but my room mates still has the function. I haven’t figured out how to send a non group text to multiple people easily since the change, and I couldn’t find anything online and was hoping you could explain more, thanks.
      Answer: There must have been an update that took it away. There’s nothing we can do about it as it’s your provider’s decision to take away such feature. If you want to enjoy it, you can actually rollback to the previous firmware version but be warned that manual flashing may void the warranty of your device.
      Some group messages come in as empty bubbles
      ProblemWhen there is a group text message, some of the messages that come through are empty bubbles. I see the name of the person and the time they sent it, but there is no message. It seems to happen with other people who have android phones. I know one person it happened with also has a Samsung S6 but is on Verizon. Thanks for the help!
      Answer: I’m not really sure how your phone is setup but it seems like it has something to do with mobile data. Group messages are considered MMS, thus you need to enable your mobile data to send and receive them. Try to verify if you can sent and receive picture messages just fine because if so, the problem might be on the sender’s end.
      Having difficulties receiving text messages from HTC One
      ProblemI have problems receiving text messages from one particular kind of phone: the HTC one. I have never had any other problems texting iPhone or Windows phones or anything in group messages. But this particular phone doesn’t like group messages on my phone. And I’ve asked other friends with the same phone, and they don’t have my problem with the group message. One on one we are fine, group messages no luck.
    Answer: Verify with the HTC One’s owner if he/she can send MMS messages because it seems like the mobile data on the phone wasn’t enabled or he/she has issues with APN. Perhaps the reason why you can’t receive a message from that phone is because it can’t send MMS.
    Can’ t send a video through text message
    Problem: Every time I attempt to send a message with a bit of a video from my camera, it comes up as over the limit, then I can’t get it to go through email, only to Facebook where I have to the forward it to someone pager then delete it from Facebook, the recipient has to do the same to get the video, it can be 3 sec. Long…. No dice, what’s the issue?
    Answer: When it comes to the amount of data transmitted over data network, there’s always a limit and there’s nothing we can do about it except shrink the size of the file you’re trying to send.
    Can’t send text message to multiple recipients
    ProblemGroup messaging vs. Multiple Recipients messaging. When I attempt to send a text message to multiple recipients, the phone seems to automatically send it out as a Group Message. I even switch the default setting to off in the settings menu. Obviously, this is any aggravating problem. Any solution to this would be greatly appreciated.
    Answer: Turn off the ‘Use MMS for Group Messages’ in the Messages Settings. Once you disabled that, text messages won’t be converted to MMS when you include multiple recipient s but you should know that when recipients reply, they’ll be received as individual messages.
    Send / Receive multimedia message through Wi-Fi
    QuestionOn my Samsung Galaxy S6 I have to be using my mobile data to get and view the multi-media messages. Is there a way I can see the photo’s and group convos thru Wi-Fi? I would also like to get the message without having to press that download button. Every one knows it’s frustrating.
    Answer: Multimedia messages are always transmitted through mobile data and there’s no workaround for that because that’s where service providers can profit from. You can, however, send text messages through Wi-Fi but not MMS.
    Can’t receive group text from a certain number
    ProblemI have 3 friends that I often group text with.  All three have iPhones. I can send texts to all 3 friends but only receive responses back from 2 of the friends.  We have looked at all the settings in the iPhone and my Galaxy S6 to find the issue but cannot find the problem.  Two of the three iPhone group members work fine; it’s only the third member of the group that can receive my texts but I do not receive their replies.  I can te xt back and forth fine with this third person individually; just not in a group. HELP!
    Answer: The problem might be on their end and we can’t do something about that since we don’t know how his iPhone was set up. Just make sure his number isn’t blocked in your phone. As you can see, you can send group text and can receive the replies from two of the contacts. It’s clear enough your phone is working fine.
    Verizon Galaxy S6 on MetroPCS Can’t download MMS
    ProblemI recently switched my carrier from Verizon to MetroPCS. I have a Verizon Galaxy S6 that I am using on metropcs. Everything is working fine except for my group messages. When a text message comes in from a recipient in a group message it comes as an individual message that i need to download, when I click download the message doesn’t download. What can I do to fix this issue?
    Answer: Just verify mobile data is enabled. If it’s turned on and you still have this issue, it’s clear the phone wasn’t set to use the APN from MetroPCS. Call your new provider and ask for the correct APN for your phone and ask the rep to guide you to set it up.
    Assign names to group messages on Galaxy S6
    QuestionI was wondering if you could name group chats, like how on iPhone you can choose a customized name for your and group. It gets really annoying when you have so many group message and don’t know which is which. I tried that group contact thing but it did not work and was not what I was looking for.
    Answer: No you can’t assign names to group conversat ions in your Galaxy S6.
    Having problems with your phone that won’t turn on?
    We can help you troubleshoot. We already published troubleshooting guides for the following devices:
    • Samsung Galaxy S2
    • Samsung Galaxy S3
    • Samsung Galaxy S4
    • Samsung Galaxy S5, Android Lollipop edition
    • Samsung Galaxy S6
    • Samsung Galaxy S6 Edge
    • Samsung Galaxy S6 Edge+
    • Samsung Galaxy S7
    • Samsung Galaxy S7 Edge
    • Samsung Galaxy Note 2
    • Samsung Galaxy Note 3
    • Samsung Galaxy Note 4 Android Lollipop edition
    • Samsung Galaxy Note 5 

    Free Download Samsung S7562 MTK 6572 Flash File

    Get Free S7562 MTK 6572 Flash File

    S7562 MTK 6572 Flash File Do   wnload
    DOWNLOADSitting tight for USB Port…< /span>
    Set MediaTek PreLoader USB VCOM Port (COM11)
    If you don’t mind Hold “ON” to interface with the telephone…
    Joined with Phone.
    CPU: MT6572 SW:0000 Ver: CA01
    Downloading Boot8 …
    EMMC Size: 0x00EC000000
    Streak Type: EMMC
    INT/EXT RAM Size: 0x0+0x0
    Sitting tight for USB Port…
    Set M ediaTek DA USB VCOM Port (COM12)
    Perusing preloader…
    Perusing mbr…
    Perusing ebr1…
    Perusing nvram…
    Perusing uboot…
    Perusing bootimg…
    Perusing recuperation…
    Perusing sec_ro…
    Perusing logo…
    Perusing android…
    Perusing store…
    Perusing usrdata…
    Perusing fat…
    Spar.

    S7562 MTK 6572 Flash File Download

    Follow Bellow instruction.
    Follow The instruction. 

     Password =mtk8
    DOWNLOAD

    Saturday, June 3, 2017

    Fix RPC S 5 AEC 0 RPC S 7 AEC error in Google Play Store

    The Error retrieving information from server RPC:S-7:AEC-0 or RPC:S-5:AEC-0 are Google Play Store errors affecting older Android OSs like 4.2 Jellybean or 4.4 KitKat and 5.0 Lollipop. Due to this error, users cant update, download or install any app or game from Google Play. Usually, the error will pop up in the middle or end of your app download session. Some popular apps affected by this error include Clash of Clans, Gmail, Viber, WhatsApp, Facebook etc. Even clearing out the data and cache of the Google Play Store doesnt seem to solve it. The most effective fix for these RPC errors is to simply remove and add back your Google (Gmail) account to the settings of your Android smartphone or tablet. The steps for this solution is very simple and even Android newbies can follow i t. Here are the steps to fix RPC:S-5:AEC-0, RPC:S-7:AEC-0 and RPC:S-3:AEC-0 errors in Google Play Store:

    How to fix Google Play Store error RPC:S-5:AEC-0 & RPC:S-7:AEC-0 

    Screenshot showing RPC:S-5-AEC-0 error while updating Gmail in Google Play
    Google Play Store error message
    The below steps will show you how to remove and add your Gmail account in Android settings. If you know how to do it, then theres no need to read these steps. Simply go to accounts settings delete your Gmail account linked with Play Store and then again add it back. That will solve the RPC error while downloading or updating apps in Google Play.
    1. Go to Settings >> Accounts >> Tap on "Google" >> Remove your main Gmail ( Google) account linked with the Play Store (Press menu select "Remove account")
    2. Go back to Settings (optional step)>> Select "Apps" then select "All" tab
      • Scroll down and select Google Play Store >> Clear data and cache for Google Play Store. 
      • Again from "All" choose Google Service Framework and Clear Data and Cache. 
      • Again from "All" choose Download Manager and Clear Data and Cache
    3. Go back to system Settings >> Accounts  >> Tap "Add account" 
    4. Add back your Gmail account. Complete the Google account setups. 
    5. Open Google Play Store and install or update the app/game that was initially giving you RPC error.

    How to fix RPC-S-5:AEC errors in older Android systems

    If you are running older version of Android prior to JellyBean, then you may have to delete the Google account manually to avoid factory resetting. To manually delete Gmail account without factory resetting, your device needs to be rooted first. Once its rooted, download a file explorer like  
    Root Explorer.
    1. Open Root Explorer app
    2. Navigate to data/ system folder  >>  Delete this file- “accounts.db”. (Note: the System folder is located inside your internal storage and not th e external SD Card) 
    3. If you cant find that  file, Go to /data/system/sync and then delete "accounts.xml".
    4. Now your account is deleted
    5. Go to Settings >> Accounts >> Add account >> Select "Google" and add your Gmail account back.
    6. Open Google Play Store and download the app which was Giving you the RPC error. 

    Hope these simple steps fixed RPC:S-3:AEC-0, RPC:S-5:AEC-0, RPC:S-7:AEC-0 and similar errors while downloading or updating apps via Google Play Store on your Android smartphone. The method 1 above has been very effective in solving other Android error codes so its a good idea to save those steps or to bookmark this webpage for later when another Google Play error strikes. If you have any other fix for this error please mention them in the comments.  [Similar fix: How to fix Play Store Error 963].

    How to fix common Samsung Galaxy Note 5 sound issues other audio problems

    How to fix common Samsung

    Galaxy Note 5 sound issues

     & other audio problems

    I’ve addressed some of the most common sound-related problems that #Samsung Galaxy #Note5 owners reported to us and the first on the list is about the “Do Not Disturb” feature that seems not to be working as the owner wanted it to. Continue reading to know how to tackle this kind of problem.
    There are other audio problems I included and answered in this article. If you contacted us about this problem before, please try to skim throu gh the page to see if your concern is among the ones I addressed.
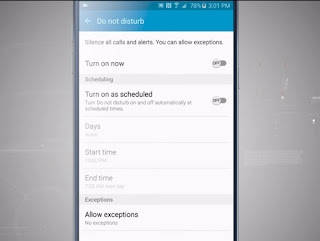
    Do Not Disturb (DND) feature doesn’t work on Note 5’s
    ProblemI have 3 Samsung Note 5’s. They are all making a sound when they receive a text with the stock texting app while in “do not disturb” mode. Even if I select messages off and it doesn’t matter if the contact is a favorite or not. Thank you in advance.
    < div style="border: 0px; font-size: 17.6px; line-height: 28.16px; margin-bottom: 20px; padding: 0px; vertical-align: baseline;">Answer: When DND is turned on, there are other things you can set to make the feature work the way you want it; you can either “Allow exceptions” or “Set schedule.” You need to check on these two settings under DND page and best way to verify that is to have “No exceptions” and to disable scheduling.
    If the problem remained after you’ve done all that, then here are the things you can do:
    First Step: Boot your Note 5 in safe mode and use DND
    The purpose of this procedure is to find out if one or some of your third-party apps is causing the problem. You would know because if third-parties have something to do with it, the problem won’t occur in safe mode as they’re temporarily disabled. In this case, all you got to do is find the culprit and uninstall it.
    However, if you don’t know which app is causing it, then proceed to the 3rd step, otherwise, the problem might be in the firmware itself. You need to go through 2nd step.
    Second Step: Try deleting the system cache through the recovery mode
    Corrupt caches may often result to inconsistencies in the system’s operations, so before doing further troubleshooting procedures, it’s recommended to wipe the cache partition of your phone. This procedure is very effective for minor firmware glitches. Here’s how you do it:
    1. Turn off your Galaxy Note 5.
    2. Press and h old the following three buttons at the same time: Volume Up key, Home key, and Power key.
    3. When the phone vibrates, release the Power key but continue to press and hold the Volume Up key and the Home key.
    4. When the Android System Recovery screen appears, release the Volume Up and Home keys.
    5. Press the Volume Down key to highlight ‘wipe cache partition.’
    6. Press the Power key to select.
    7. When the wipe cache partition is complete, ‘Reboot system now’ is highlighted.
    8. Press the Power key to restart the device.
    Should this procedure fail to fix the problem, then the 3rd step will.
    Third Step: Backup your data and perform the master reset
    This is your last resort because you will spend a lot of time backing up your data, files, apps, etc. before you can actually do t he reset. Once you’ve backed up every single file in your phone, remove your Google account and disable all screen locks and follow these steps:
    1. Turn off your Samsung Galaxy Note 5.
    2. Press and hold the Volume Up, Home and Power keys together.
    3. When the device powers on and displays ‘Power on logo’, release all keys and the Android icon will appear on the screen.
    4. W ait until the Android Recovery Screen appears after about 30 seconds.
    5. Using the Volume Down key, highlight the option, ‘wipe data/factory reset’ and press the Power key to select it.
    6. Press the Vol Down button again until the option ‘Yes â€" delete all user data’ is highlighted and then press the Power key to select it.
    7. After the reset is complete, highlight ‘Reboot system now’ and hit the Power key to restart the phone.
    I hope this helps.
    How to lengthen ringtone on Note 5 or change the number of rings
    ProblemThe ring tone shuts off after one call.  I can reset the phone,  and that works for one call.  I can go into settings and the clothes ring tone is selected.  Once I do that it will ring probably for one call,  then it will only buzz.  This pattern applies weather I put the phone in my purse, or on the desktop.
    Answer: Depending on your service provider or carrier, there’s a certain number you can dial via the Phone app in your device to lengthen the ringtone or change the number of times it will ring. Of course, if you don’t know that, you have to call your service provider because this setting needs to be done through the network you’re connected with. You cannot change it via the Settings in your phone.
    Note 5 crackles when playing videos
    ProblemWhile playing videos or anything on my phone, it makes a crackling sound. I’ve tried restarting it and turning my phone off and back on but nothing seems to be working. It works for a short amount of time when I hit the back of my phone, but I don’t know what damage it’s doing, so I stopped doing that. I’ve only had this phone for about a month. It’s been about 2 weeks. I thought it would fix itself eventually but I guess not.
    Answer: Note 5 crackles when you open the camera as the aut o-focus feature comes into play. Is it the same crackle the device makes when you play videos? If not, then don’t waste any time as it might lead to a serious problem. I assume, of course, that the sound doesn’t come from the videos you play.
    Note 5 videos played either low- or high-pitched
    ProblemSound playback from any videos or music is either very slow/low pitched or slightly too fast/high pitche d sounding. We have tried many settings changes but we can’t find anything. Any help would be awesome! Thanks!
    Answer: Well, it must be the setting. For us who don’t know how the phone is set, it’s difficult to pinpoint what or where the problem is so, we suggest you do a general troubleshooting procedure and that’s to clear the cache and data of the video player you use or the Camera if you tried playing the videos there. Doing so will bring the app to its default settings.
    Music doesn’t show up on the lock screen of the Galaxy Note 5
    ProblemMy music doesn’t show up on the lock screen and I have tried every single option but nothing seems to work. Its extremely frustrating. I tried Googling as well but nothing seems applicable.
    Answer: If I’m not mistaken, this feature stopped since Lollipop, although there are other third-party music apps that can still show up on the lock screen . The stock music player can’t do that anymore. Try using Google Play Music instead. It still works.

    CONNECT WITH US

    We are always open to your problems, questions and suggestions, so feel free to contact us by filling up this form. This is a free service we offer and we won’t charge you a penny for it. But please note that we receive hundreds of emails every day and it’s impossible for us to respond to every single one of them. But rest assured we read every message we receive. For those whom we’ve helped, please spread the word by sharing our posts to your friends or by sim ply liking our Facebook .

    Friday, June 2, 2017

    Samsung Note 4 Shuts Down When Battery Reaches 30

    Samsung Note 4 Shuts Down When Battery Reaches 30%
    Problem: When my battery reaches approximate 30% it auto shuts down and when i boot it up it becomes 0% is the cause of this ,my battery? Maybe it’s faulty? I have been using my note 4 for about a year and a half should i get a new battery?

    Solution: It looks like the battery of your phone is already faulty. Try backing up your phone data first then do a factory reset. Once the reset is done do not install anything in your device yet . Check first if the issue remains. If it does then proceed with getting a new battery.

    Guide on how to rename a song on a Samsung Galaxy S2

     Songs are really tricky little things to get quite right, weve all got that blighter that has just got the wrong title for some reason or another and weve added the track to out phone, wrong title and all. If you really want to correct the name its surprisingly easy by using your phone to correct the title.

    Firstly we need to go into the "My files" application, to find this you will need to search through the Application drawer. As you can see in the image to the right it looks like a folder with some files in though it should be easy enough for you to find.

    After opening the "My files" you will need to locate your music folder. In my case the location is in a sub folder and to find it I need to click on "Samsung" and then "Music" (though many people will have had a more logical route to there music). After youve done this you will see a list of all the tracks in the folder (see screen shot to the left).

    From here you have two options, one is by pressing the menu button and then click "Settings", "Rename" and then find the track you want to rename. Alternatively find the track you want tore name and give it a long press so a list of options comes up (like the screen shot on the right). Here you should click "Rename" and change the song title to the correct one.

    As well as renaming songs you can also rename videos and photographs on your phone. To do this you need to select the correct folder (for e xample DCIM-> Camera for photographs) and find the file you want to rename.

    Thursday, June 1, 2017

    How To Fix Common HTC One M8 Problems and Errors Part 16

    How To Fix Common HTC One M8 Problems and Errors [Part 16]


    Aside from sending us an email you may also contact us through our Facebook and Google+ social media accounts.
    M8 Won’t Ring
    ProblemHey there, I saw your blog. I have recently had trouble with my phone, What happened was when I woke up this morning my phone wasn’t ringing or making any noise when I made calls. To either an interstate relative or 101 or Telstra help. But when I rang my wife it worked. I put this down to anything but mobiles, but at work I tried to ring a co-worker and he said it rang but there was no noise on his end and no noise on mine. Telstra help have told me it’s because of ok Google and only way to reset is do a factory reset. I’m writing to you in hope there is something else I can try? If you need any more info let me know cheers.
    Solution: For call relate issues on phones the first thing to check is the network. However, since you contacted Telstra regarding this issue and they said that a factory reset will resolve the issue then there is a big possibility that it will. Your carrier may have received several calls concerning this particular issue and they have already found the cause and the solution.
    The best thing to do right now is a factory reset. Before performing this procedure you should backup your phone data as this will be deleted in the process.
    M8 Won’t Stop Vibrating
    ProblemHi my phone will not stop vibrating every 3 minutes it’s like I’m getting notifications every 3 minutes which I’m not its very annoying could you please help me.
    Solution: Thi s issue could be caused by an app that you installed in your phone. You can check if this is the case by starting your phone in Safe Mode. In this mode only the default apps are loaded while the third party apps you installed from the Google Play Store are disabled. This makes troubleshooting easy to do.
    Note: Make sure that you have disabled Fast boot first.
    • Press and hold the Power button (located on the top edge of the device) until the ‘Phone options’ prompt appears then release.
    • Tap and hold Power off until the ‘Reboot to safe mode’ prompt appears then release.
    • From the ‘Reboot to safe mode’ prompt, tap RESTART to confirm.
    • Allow approximately 1 minute for the process to complete.
    • Upon reboot, ‘Safe mode’ appears in the lower left of the unlock/home screen.
    If your phone does not vibrate in this mode then the issue is most likely caused by an app you installed. Find out what that app is and uninstall it.
    M8 Car Bluetooth Disconnects
    ProblemHi, I have a M8 with Android 4.4.4. During calls in different BMW cars, bluetooth will sometimes disc onnect and send the call back to the phone. The car bluetooth doesnt show the phone for a minute and then reconnects again. As it happens with different cars, i assume it is a phone issue. I believe, this phenomenon was not there before the 4.4.4 update. Can you help? Thanks
    Solution: There are quite a lot of owners of this phone that have also been experiencing Bluetooth connection issues with their cars. In your case the issue occurs even with different cars which means that the problem can be isolated to the phone itself.
    The first thing that you need to do is to check if there are any new software updates for you phone. These update come with improvements and bug fixes that may help resolve the issue.
    After you have verified that your phone software is up to date you should delete the B luetooth pairing between your phone and the car then reconnect again. Make sure that you don’t use any special characters when naming your device. You can check this by going to Settings > Bluetooth and checking the Device name.M8 Headphones Not Working
    ProblemGood afternoon..first, thank you for taking your time and making your website, i find it helpful. Problem-my heaphones have stopped working on my htc one m8..listening to music and then it stops and only comes out of the sp eakers..i have read you post about this issue and have tried to clean the jack(not sure if it did anything) and i have reset my phone..if i plug in old headphones, no bluetooth, they work..can you help or should i go to the sprint store and have them look at it? Thanks
    Solution: It seems that this issue could already be caused by a hardware fault. You have already performed all the necessary steps to check this issue such as cleaning the headphone jack, trying a new pair of headphones, and doing a reset.
    Your best option right now is to bring the phone to an authorized service center for checking.
    M8 Flash Not Working
    ProblemHello, guys I really love your website with lots of info. However the flash is not working on my HTC one m8 please help
    Solution: Have you checked the settings if your flash is on? Open your camera app then tap the camera icon (the one that looks like a lightning with an arrow pointed down). Make sure that it is on or set to auto.
    If your flash is turned on and it still does not work then try to start your phone in Safe Mode. A third party app that you installed may be causing this issue and starting your phone in Safe Mode is one way to check if this is the case.
    Note: Make sure that you have disabled Fast boot first.
    • Press and hold the Power button (located on the top edge of the device) until the ‘Phone options’ prompt appears then release.
    • Tap and hold Power off until the ‘Reboot to safe mode’ prompt appears then release.
    • From the ‘Reboot to safe mode’ prompt, tap RESTART to confirm.< /div>
    • Allow approximately 1 minute for the process to complete.
    • Upon reboot, ‘Safe mode’ appears in the lower left of the unlock/home screen.
    Try taking a photo with your flash turned on. If the flash works then the problem may be caused by a third party app. Find out what that app is and uninstall it.
    If the issue still persists in safe mode then you should proceed by doing a factory reset. This brings your phone back to its original condition when it was new. Make sure you backup your data be fore proceeding.
    • Press and hold the VOLUME DOWN button, and then press and hold the POWER button.
    • Wait for the screen with the three Android images to appear, and then release the POWER and VOLUME DOWN buttons.
    • Press VOLUME DOWN to select FACTORY RESET, and then press the POWER button.
    Your camera flash should be working by now. If it still does not work then this may already be a hardware problem. In this case, you should bring your phone to an authorized service center for checking and repair.
    M8 Volume Down Damaged
    ProblemHello I have had my HTC one m8 for just about five month’s. Yesterday I dropped it on accident and when I was checking it over I noticed my volume button was jammed down. I am able to turn things up but not down. Is there any way that I would be able to fix it without going in to Verizon?
    Solution: The HTC One M8 is one of the most difficult smartphones to disassemble. Unless you really know how to proceed I suggest you let the experts handle it. Since your volume button has obviously been damaged by the drop then I suggest you bring your phone to an authorized service center for repair.
    M8 Software Upgrade
    ProblemI heard about a software upgrade for htc one m8.How do I go about getting it installed on my phone?
    Solution: To upgrade the software of your phone you should first enable the automatic update settings.
    • Go to Settings, and then tap About.
    • Tap Software updates.
    • To save on data usage, you can choose to update through Wi‍-Fi only.
    • Choose whether to auto-download system updates, app updates, or both.
    If your phone is connected to the Internet and it finds a new update available you will get a notification.
    • Slide the Notifications panel open, and then tap the system update notification.
    • If you don’t want to download the update using your data connection, select Update over Wi-Fi only.
    • Tap Download.
    • When download is complete, select Install now, and then tap OK.